von Thimo Hofner
Are you like me and have an ambivalent relationship with PMax campaigns? Thanks to maximum automation, they are very easy to create and now work very well.
However, this automation also brings challenges: a lack of transparency, little control and often a feeling of not being able to keep a complete eye on the campaigns.
Scripts can help you close these gaps. They provide you with additional data, simplify analysis and give you more control over your campaigns. In this article, I’ll introduce you to 10 scripts that you can use to better understand and optimize your PMax campaigns. Ready? Let’s go!
By the way, if you want you can also check out my Video on this:
Also, check out my Performance Max campaign guide for more in-depth information about the campaign type.
Google Ads scripts are small snippets of code that automate tasks in your account. They allow you to analyze data, create reports or even adjust campaign parameters automatically. Scripts use JavaScript and can be inserted directly into the Google Ads interface.
Their big advantage: they save time, provide deeper insights and create transparency where Google’s standard tools reach their limits. Instead of checking everything manually, you can use scripts to standardize processes and manage your account more efficiently.
Don’t worry, you don’t have to become a web developer now. Fortunately, there are experts who have already developed numerous scripts and made most of them available to the community free of charge.
At this point, I would like to give a shout-out to experts such as Mike Rhodes, Nils Rooijmans and Floris de Schrijver. Thanks to them for their contribution to the Google Ads world!
Follow these experts if you want to get more out of your campaigns. They regularly share helpful scripts and practical tips to make your work with Google Ads easier.
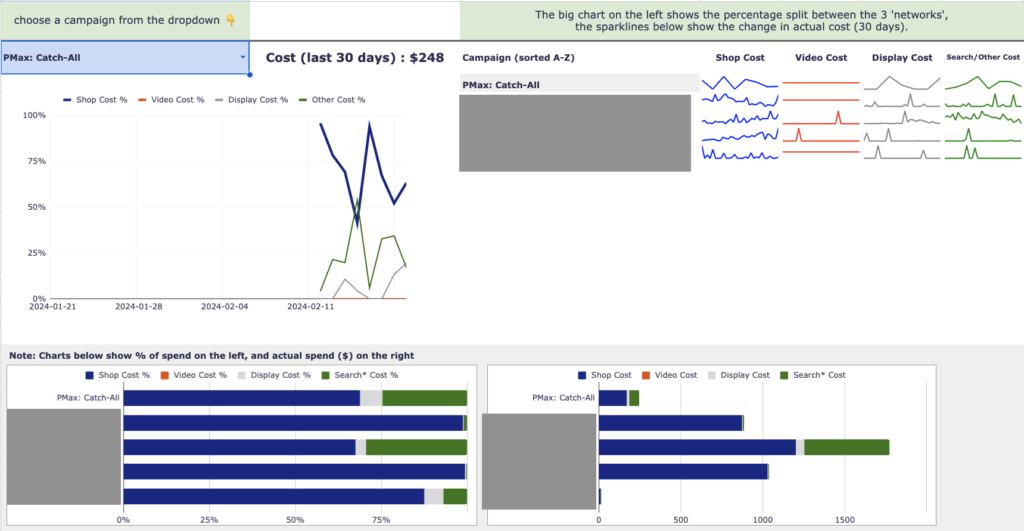
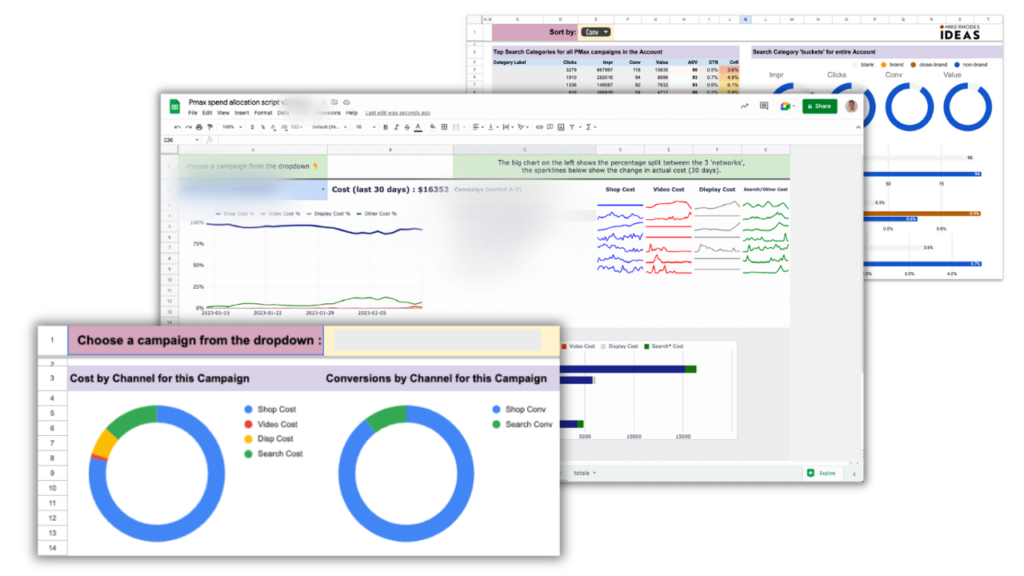
Do you lack an overview of how your PMax budget is actually being used? One of the most common criticisms of Performance Max campaigns is the lack of transparency in budget allocation. This script solves exactly this problem. It shows you how much budget is allocated to different channels such as Shopping, Video, Display and Search. This allows you to quickly recognize which channels take up the most budget and whether the results are in proportion
The script not only gives you transparency but also the basis for targeted optimizations. Instead of groping in the dark, you know exactly where you should intervene to get the best out of your campaign.
It helps you to better analyze and understand your PMax campaign. If you want to know more about this, you can find a comprehensive guide here: Analyzing PMax campaigns
Use cases:
Link:
Performance Max Spend Allocation Script – GitHub
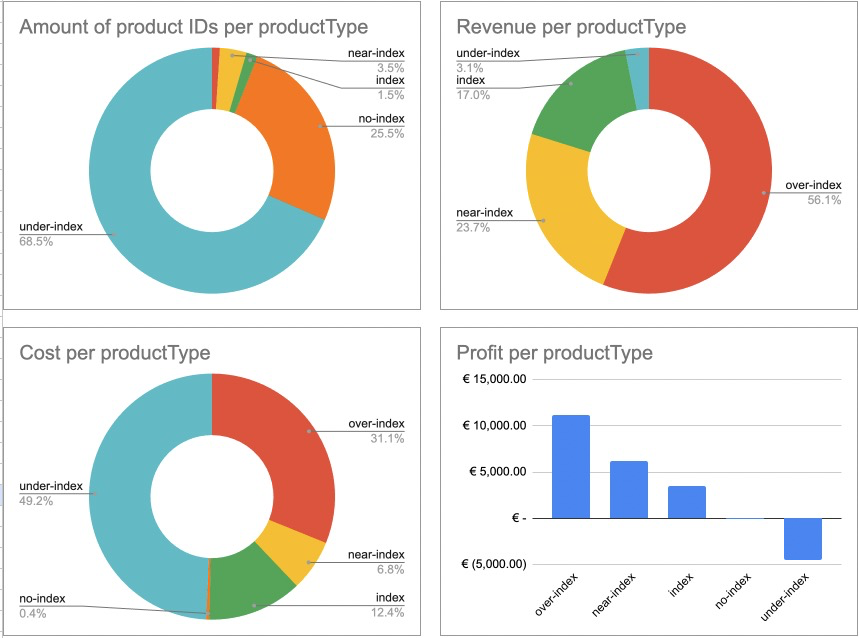
With the Flowboost Labelizer you can easily divide your products into different performance clusters. The script assigns labels such as “no index”, “under index”, “near index”, “index” and “over index” so that you can see at a glance which products are selling well – and which are not.
These labels provide a structure that allows you to direct your budget towards top sellers without neglecting products that also have potential.
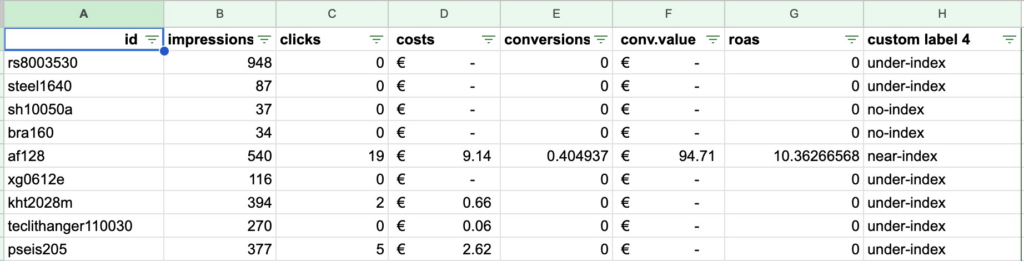
A big advantage is that you can define yourself when a product is considered a “top seller”. This allows you to customize the threshold values and adapt your campaign strategy accordingly. Thanks to this granular analysis, you can ensure that your campaigns work efficiently while giving all products a fair chance.
The data is aggregated in a Google Sheet, which also gives an overview of the current status. This means you can see how much budget you are using for low-performers or “under index” products and what small proportion of your total sales they account for.
Use cases:
Link:
Flowboost Labelizer – Floris de Schrijver

Are you familiar with the problem of generating lots of clicks in your Performance Max campaigns, but no conversions? The lack of transparency in PMax often makes it difficult to identify inefficient search terms. This is exactly where this script helps. It automatically detects search terms that generate clicks but do not deliver results. The data is summarized in a Google Sheet, and you can even set up email notifications if required.
This script puts you back in control so you can avoid unnecessary costs. You can see at a glance where your campaign needs to be readjusted and can set targeted exclusions to use your budget more effectively. Unfortunately, you can only set exclusions for PMax campaigns at the account-level or via your Google Ads Rep. However, at the time of writing, the beta for negative keywords is already rolling out at the campaign-level.
Use case:
Link:
Non-Converting Search Term Alerts – Nils Rooijmans
Stay one step ahead by recognizing which search categories are currently gaining popularity. The PMax Trending Search Categories Script helps you to identify emerging trends early on before your competition becomes aware of them. It automatically analyzes your campaigns and highlights categories with significant increases in impressions.
With these insights, you can proactively adjust your campaigns, optimize content and ads for trending categories and make sure you’re always on the pulse.
Use case:
Link:
PMax Trending Search Categories – Nils Rooijmans
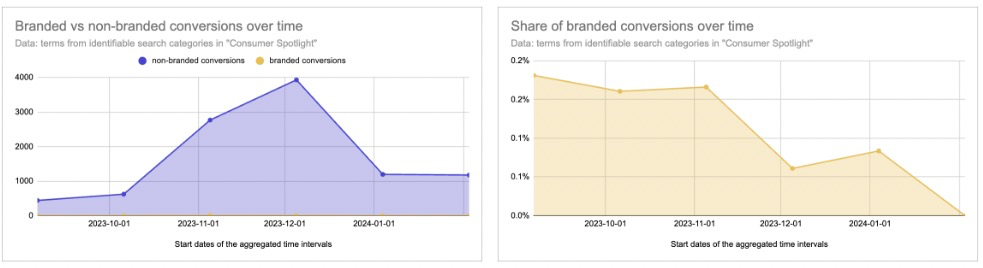
In Performance Max campaigns, it is often unclear how much of your budget is used for brand-related and how much for generic search queries. Although you can view search terms via PMax Insights in Google Ads, manual analysis is time-consuming and not very easy. In addition, PMax campaigns are opportunistic and often prefer to bid on brand terms, as these usually deliver the best performance. As a result, you risk neglecting generic terms that are crucial for acquiring new customers.
The Brand Traffic Analyzer automates this process and presents the split between brand and generic traffic in easy-to-understand diagrams. The script accesses the Consumer Spotlight Report and shows you how changes to budget or ROAS targets affect the split. The results are saved in a Google Sheet so that you can keep an eye on the development of your campaign and optimize it based on data.
Info: If you don’t want your PMax campaign to bid on brand terms, you can exclude the brand in the campaign settings. You can find out more here: Exclude brand keywords from PMax campaigns
Use cases:
Link:
PMax Brand Traffic Analyzer – Smarter Ecommerce

Sudden changes in your campaigns can quickly lead to unnecessary costs or poorer results. This is exactly where the Account Anomaly Detector comes in. This solution automatically monitors the performance of your Google Ads account and compares it with historical data from the same day of the week. As soon as unusual deviations occur, you will be notified. This allows you to react quickly and keep your campaign performance stable.
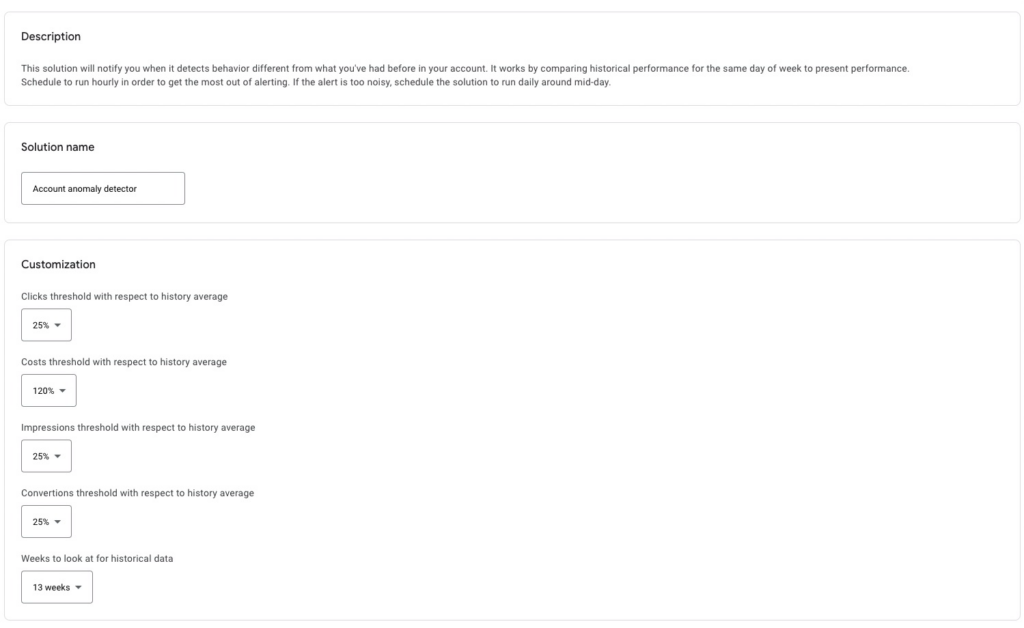
In contrast to a normal script, this is a so-called solution that is available directly in the Google Ads interface and can be used without any technical effort.
What is a Google Ads solution?
Google Ads Solutions are ready-made script templates that are provided in the Google Ads interface. They require no additional setup or technical knowledge. With just a few clicks, you can activate and customize a solution to use it for your specific needs.
Customization options for the Account Anomaly Detector:
Click, impression and conversion thresholds: 25% deviation by default, but can be customized as desired.
Cost thresholds: Adjustable, e.g. cost > 120% of average.
Historical database: Analyzes up to 52 weeks to create well-founded alerts.
Notification: You can store your e-mail address to be informed automatically.
Use case:
Disapproved products in the product feed can significantly affect the visibility and performance of your campaigns. Especially for Performance Max campaigns that rely heavily on Shopping components, a problem in the product feed can lead to important products no longer being advertised. The Disapproved Products Alerts Script helps you to recognize such problems at an early stage.

The script regularly checks your product feed for rejected products. As soon as a problem is detected, you will receive a notification by email. It saves you valuable time by not having to manually search for errors and ensures that your products remain visible. The check is based on criteria that you can customize so that the tool is perfectly tailored to your requirements.
Use case:
Link:
Disapproved Products Alerts – Nils Rooijmans
One of the most common criticisms of Performance Max campaigns is the lack of control over placements. It is often unclear where your ads are actually displayed. This can lead to budget being wasted on inefficient or inappropriate placements. The PMax Placement Exclusion Suggestions Script gives you more control over your campaigns.
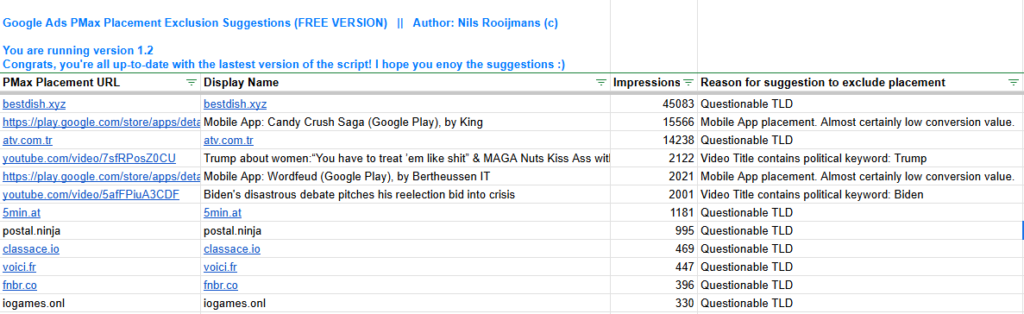
The script analyzes the placements of your ads and creates suggestions as to which ones you should exclude to increase the efficiency of your campaign. This way, you can ensure that your budget is only used on high-quality and relevant pages. The results are presented in a clear Google Sheet, which gives you a clear overview and simplifies optimization.
Use case:
Link:
PMax Placement Exclusion Suggestions – Nils Rooijmans
Performance Max campaigns offer great potential for automation but often lack the granular insights you need for in-depth optimization. The PMax Whisperer Script by Mike Rhodes closes this gap. It provides you with detailed insights into the performance of your campaigns by summarizing data clearly and creating easy-to-understand reports.
The script analyzes all key areas of your PMax campaigns, including search terms, impressions and conversions. It provides information that is difficult or impossible to see in the Google Ads interface. This gives you better control over campaign performance and allows you to make informed decisions to target your budget.
Customization options:
Use case:
Link:
PMax Whisperer Script – Mike Rhodes
The All-In-One PMax Script by Mike Rhodes is a comprehensive solution for Performance Max campaigns that combines numerous functions in a single script. It provides in-depth insights into search terms, budget allocation, asset performance and conversions. The script combines many of the functions of the different scripts I have presented in this post.
In contrast to the other scripts presented here, this one is subject to a fee (currently from $199). But I didn’t want to leave it unmentioned.
Mike Rhodes is constantly adapting this script so that new functions are always being added.
Customization options:
The script allows you to customize the reports to your needs and highlight the most important KPIs. You get a clear presentation of all relevant data points, which makes targeted optimization easier.
Webinar:
If you would like to learn more about the script, you can watch a webinar in which Mike Rhodes explains in detail how the tool works and how it can be used.
Watch the webinar
Use case:
Link:
All-In-One PMax Script – Mike Rhodes
Setting up scripts in Google Ads is easier than it sounds and only takes a few minutes. Here’s a step-by-step guide:
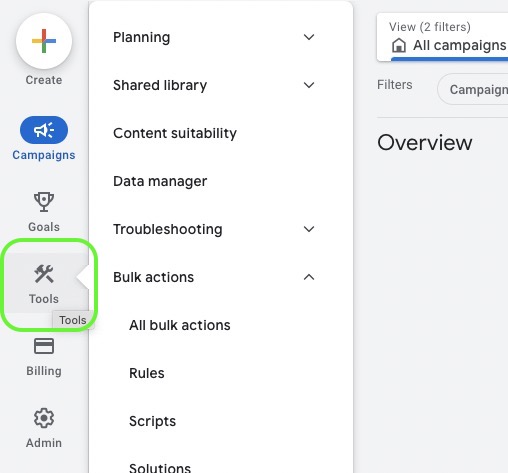
1. Navigate to Scripts:
Sign in to your Google Ads account, click on the tool icon in the top right corner and select “Scripts” in the “Bulk Actions” section.
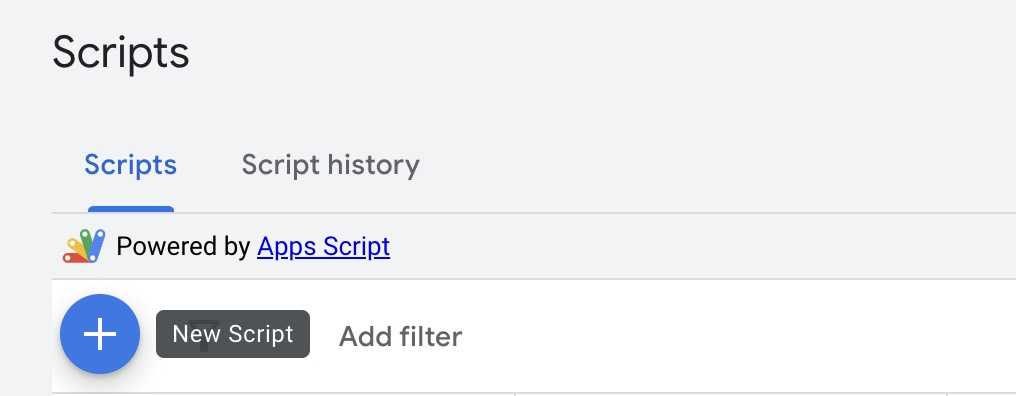
2. Add a new script:
Click on the plus sign ( ) to create a new script.
3. Paste code:
Copy the script you want to use and paste it into the editor.
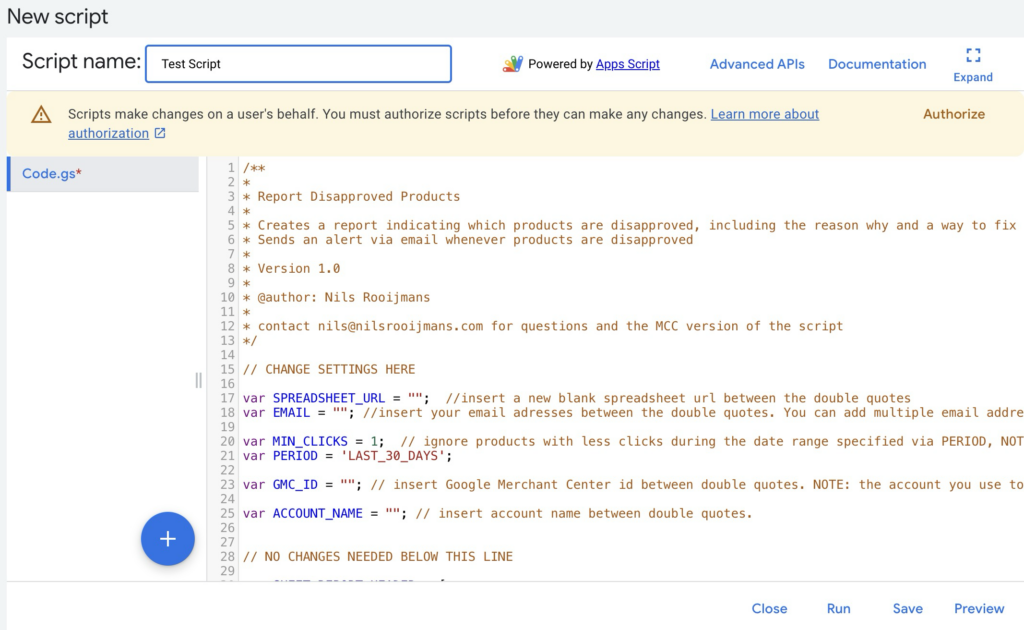
4. Customize script template:
In each script there is an area for individual settings. Here you can, for example, store a link to a Google spreadsheet in which the results are saved or define threshold values that are relevant for your campaign.
Just pay attention to the documentation of the respective script. It always explains simply what you need to change and when you should no longer change anything.
Example:
javascriptCopyEditvarSPREADSHEET_URL = "https://docs.google.com/spreadsheets/d/..."; // Insert the URL of your Google Sheet here
var EMAIL_ADDRESSES = "deinemail@example.com"; // Enter the e-mail addresses that should receive notifications here

var IMPRESSIONS_MIN_ABS_DIFFERENCE = 100; // Define the minimum number of impressions
var IMPRESSIONS_MIN_REL_DIFFERENCE = 0.5; // Set a minimum difference in percent
var SEND_EMAIL = true; // Enable or disable notifications
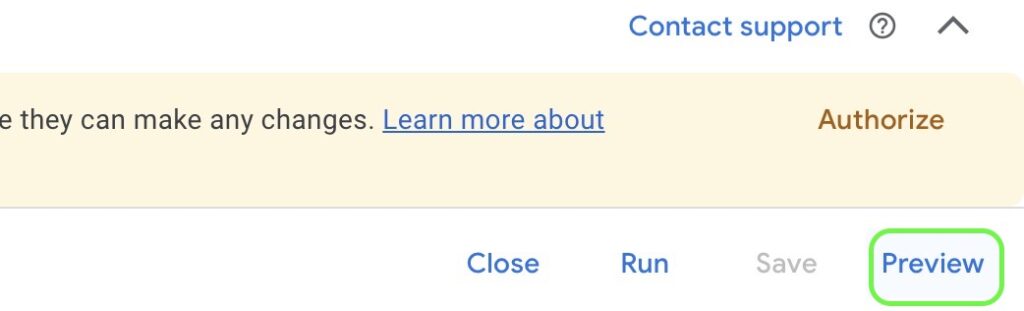
5. Execute preview:
Before you activate the script, carry out a test run. This will ensure that the code does not contain any errors and works as expected.
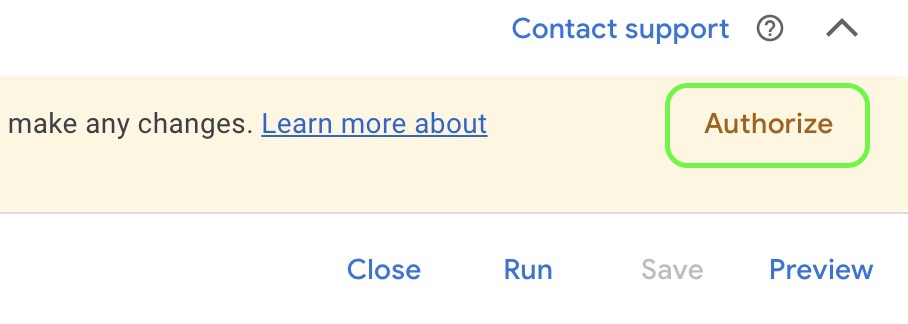
6. Authorize the script:
Before running the script for the first time, you must authorize it so that it can access your Google Ads account. To do this, click on “Authorize” and follow the instructions.
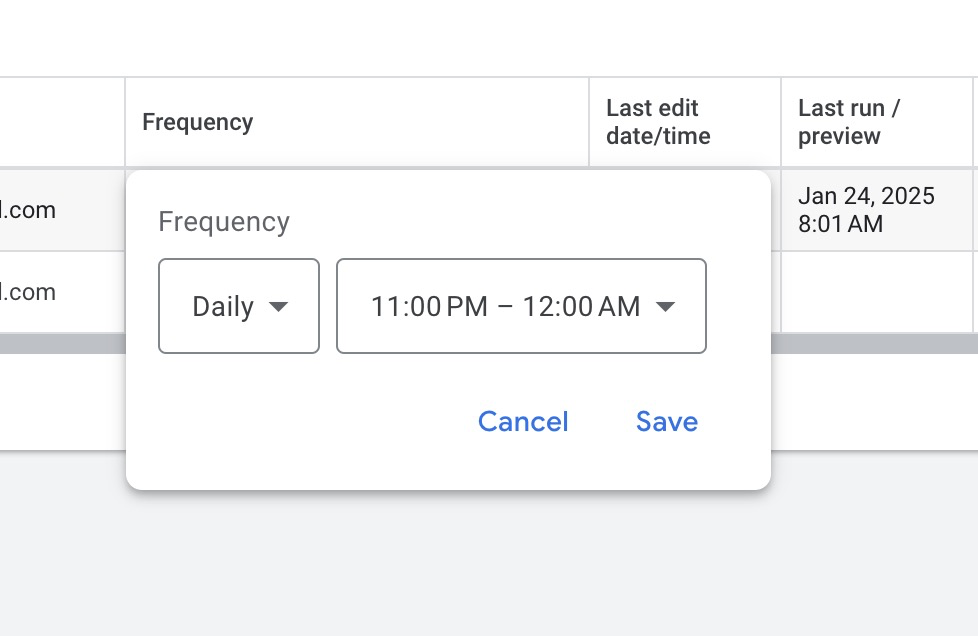
7. Set the execution frequency:
Set up a schedule to run the script automatically – e.g. hourly, daily or weekly. The appropriate setting is usually mentioned in the script documentation.
8. Check the results:
After execution, you can view the results in the script log. There you will find reports, data or any errors that occurred during execution.
Of course, also check the Google Sheet, where any new updates should appear.
Performance Max campaigns can often seem like a black box, but with the right scripts, you can gain crucial insights. They help you to uncover weak points, optimize in a more targeted way and bring transparency to your campaigns.
With the scripts presented here, you can understand your campaigns better, manage them more effectively and get more out of your budget
I hope this article has helped you and perhaps introduced you to a few new ways of managing your campaigns. Good luck with it!
Work smart with Clicks in Mind

Hi, my name is Thimo Hofner. I have been working in online marketing as a Google Ads Manager for more than 5 years. Through many courses, trainings and most importantly working with many different clients, I have learned the best strategies for success with Google Ads. On my blog and YouTube, I share my knowledge to help you drive more success with online marketing.
Driving Your Success Through Smart Online Marketing.
As a reliable partner, I can help your company generate more customers and sales with Google Ads. After more than 5 years as a Google Ads Manager and more than $1.2 million in managed advertising budgets, I can quickly recognize where you need to make adjustments to get more out of your budget.

© 2026 Clicks in Mind